To get you started with using erwin Data Intelligence (erwin DI), this topic walks you through the erwin DI User Interface (UI), its components, and their functions.
Once you have installed erwin DI, follow these steps to access and use it:
- Start erwin DI.
- Enter your credentials.
- Select the I accept & agree to the terms of the Software Transaction Agreement check box.
- Click Sign In.
The Login page appears and displays the license information link at the bottom of the page.
After a successful login, the following page appears.
Alternatively, you can setup a Single Sign-On (SSO) for login. For more details on configuring SSO, refer to the SSO Configuration Guide.
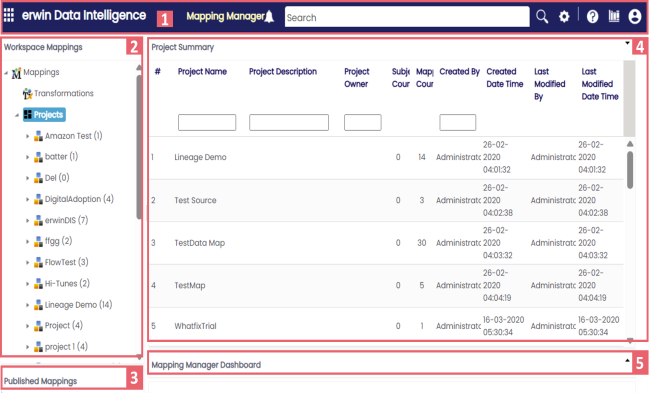
By default, the landing module is set to the Mapping Manager. You can change this under your account settings.
|
UI Section |
Function |
|---|---|
|
1-Navigation Pane |
|
|
|
|
|
|
|
|
|
|
|
|
|
|
|
|
|
|
|
|
2-Workspace Mappings |
Use this pane to browse and work on different projects and mappings. |
|
3-Published Mappings |
Use this pane to browse through published mappings and export them, if needed. |
|
4-Central Pane |
Based on your selection in the Workspace Mappings pane, use this pane to view or work on the data. |
|
5-Mapping Manager Dashboard |
Use this pane to view statistics related to mappings and projects in the Mapping Manager. |
Application Menu
To access the Application Menu, click ![]() .
.
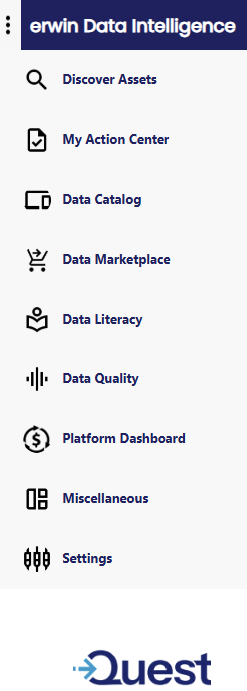
The Application Menu classifies the functional modules in different categories. Select a category to view its modules. Refer to the following table for a list of categories and their relevant modules.
|
Category |
Modules |
|---|---|
|
Discover Assets |
|
|
My Action Center |
|
|
Data Catalog |
|
|
Data Marketplace |
|
|
Data Literacy |
|
|
Data Quality |
|
|
Platform Dashboard |
|
|
Miscellaneous |
|
|
Settings |
|
My Settings
To access settings, go to ![]() Options >
Options > ![]() My Settings.
My Settings.
The My Settings page appears. By default, the Language Preference tab opens.
Use the following tabs to update language and password:
- Language Preference
-
Select your preferred language from the Language Preference dropdown menu and click Update Language.
-
Password
-
Update your current password to a new one and click Update Password. Also, you can use the Reset button to clear all the password fields.
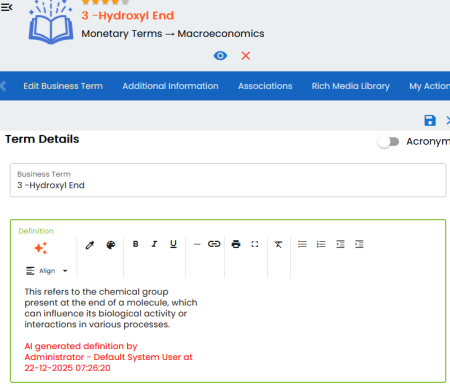
erwinAI Inline Assist
erwinAI Inline Assist integrates generative AI into Business Glossary Manager, Metadata Manager, and Data Marketplace to help you quickly generate and enrich asset details.
To use erwinAI Inline Assist, ensure that your administrator has enabled this feature for you. Once enabled, the erwinAI icon (![]() ) appears next to supported fields, such as Definition, Description, Notes, Logical Name, Comments, SDI Classification, and Tags across business assets, marketplace assets, tables, and columns. Simply click
) appears next to supported fields, such as Definition, Description, Notes, Logical Name, Comments, SDI Classification, and Tags across business assets, marketplace assets, tables, and columns. Simply click ![]() in any supported field to generate AI-powered content instantly.
in any supported field to generate AI-powered content instantly.
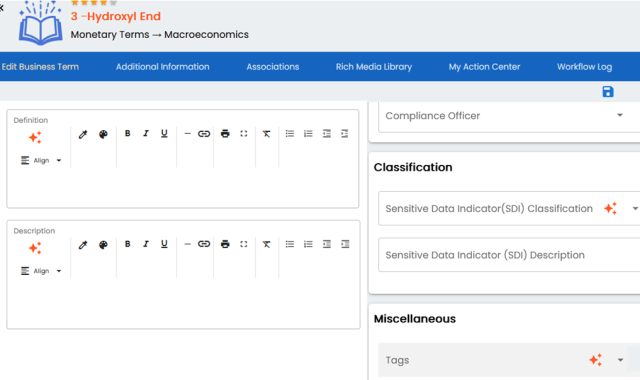
For example, the screenshot below shows the erwinAI icon (![]() ) for supported fields in a business term.
) for supported fields in a business term.
When you click ![]() in the Definition field, it generates a definition and marks it as AI-generated.
in the Definition field, it generates a definition and marks it as AI-generated.